Sunday, November 10, 2019

The Exploding 18650 Battery!


November 10, 2019

Just this morning, around 10:30, as we were on our way to the supermarket.  I was driving and my wife was sitting on the passenger side.  When she suddenly noticed some smoke coming out of my EDC (Every Day Carry) bag.  The bag was placed between the driver and passenger seat. 

Then, just before I turn my head to look, we heard a "Phoooof" sound, just like the sound of a .22 caliber pistol being fired.  And as I saw my bag, smoke and fire were building up.

Our vehicle was in the middle of the street because we were about to turn left to another street.  There was an island on my left.  

I immediately opened my door and throw the bag on the island.  I think I stepped on my bag a few times to put the fire out (I was in a little bit of a panic mode at that moment, so I was not sure if I really did that, eheheh.)

My immediate thought was that the battery of the flashlight inside the bag short-circuited, and that had caused the smoke and fire.  But as a dumped the content of the bag on the ground, I saw that my flashlight was intact.  Then I realized what had really happened.  

My EDC bag contains the following items.

First of all, being a Letranite, I always carry the Rosary (made of metal).
Some loose change/coins (metal)
A six-inch lightning chord (both ends are metal)
Few keys with keychain (metal)
The flashlight (also metal)
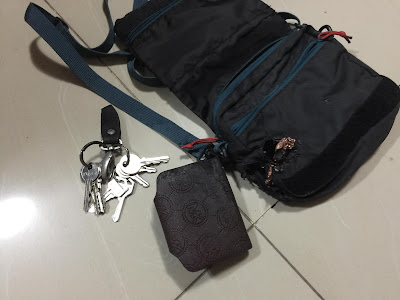
An ID/cardholder (synthetic leather)
Some bills (paper)
And an extra 18650 spare battery for the flashlight, which in my stupidity, I did not put in a case.

So, with all the metal content of the bag, the two terminals of the spare battery got in to contact, which created first the smoke, and finally made the battery short-circuit and explode! Bhhaaammm!

Fireworks!

It was a good thing though that the vehicle was not moving at that moment, and there were only few other vehicles on the street.  So, we really did not cause any traffic.

When I was sure that the fire was out, I took back the bag, and it's content, which by then was all on the ground.  I piked all the coins (it's a pity to leave them there), the Rosary, the cardholder which was burned, and of course the bills.   

We had to open all the windows of the car to let the smoke out.  Which I can really say smells terrible.  It's like having your face in front of a really old smoke-belching vehicle whose engine had not had an oil change in decades!  But much worst. 


But, I am still thankful that only my bag, the cardholder, and the spare battery were damaged.

The car still has a bit of that foul smoke smell, and hopefully, it will all be gone tomorrow.

So, that's it, our misfortune of the day.

Lesson.  Be very careful with your battery.  Put them in a case!


Sunday, February 10, 2019

The First Hydroponic Pacham Project

(October 30, 2018)

I was really excited when I finally got my Hydroponic Nutrient Solution.  So, the following day after we got the nutrient solution (October 28), I searched our house for a container that I can use for the project.

And I found this!


These I think will be perfect for a Peppa Dew plant.

So, I converted it into a hydroponic container.

First, I cut a hole on the blue lid, big enough for the red cup to fit in.

Then I punched some holes in the red cup.  Those holes are intended to let some water in.  Also, that is where the roots would eventually come out to reach the water.


Lyle, (the one where we bought the solution from) told us that we should put 25ml of each solution for every 10 liters of water.

The containers water level should be just enough for it to reach about a centimeter of the cup.

The container will need 2 liters of water for that, which means that I will have to put 5 ml of SNAP A and 5 ml of SNAP B.


I then put some white stones on the red cup and then the Peppa Dew plant (the one I planted last September 29 - October 14 blog posting date).  Then covered the roots with some more white stones (first picture).

I hope that the plant would bear many fruits.

Wish me luck!


Sunday, February 3, 2019

The SNAP Hydroponic Solution


SNAP solution or Simple Nutrient Addition Program solution is one of the many nutrient solutions that you can use for hydroponics.

SNAP was developed by Dr. Primitivo Santos and Dr. Eureka Ocampo of the University of the Philippines Los Baños, Laguna, Institute of Plant Breeding, with the help of the Department of Agriculture’s Bureau of Agricultural Research.  They made their research in 1999, twenty years ago.

This was developed as a low-cost solution for small scale (backyard and commercial) farming.

Low-cost, because you only need a container with a cover to hold the water with the SNAP solution, and some cup/s with some gravel or coco peat that will hold the plants.  Also, the solution itself only cost around Php300.00 to Php350.00 a pair.  And you do not really need a water pump, unlike other large-scale hydroponic farms.

A set of SNAP is composed of SNAP A and SNAP B, which you will add to water one at a time.

The ratio is 25ml of SNAP A to 10 liters of water, then you need to mix it well.  After that, pour 25ml of SNAP B to your 10 liters of water with SNAP A solution.  Then mix it well again.

You can use either the SNAP A first or the SNAP B first.  Just make sure not to pour them both at the same time.  I have not tried it yet, but they say it will have a chemical reaction and your solution will turn to white stones.

That is also why they came in separate bottles.

Most of the SNAP Farmers/Gardeners use a styrofoam box.  The used styrofoam box that is used to transport grapes is the most economical.  One can even get it for free, just ask your friendly fruit stand seller for some.

University of the Philippines Los Baños is giving seminars about SNAP.  I hope I can attend one of those seminars this year.

I will make an update of this post, once I learned some more new things about SNAP.