Arrange per Blog Topics

Showing posts with label PachamGarden. Show all posts

Sunday, February 10, 2019

The First Hydroponic Pacham Project

(October 30, 2018)

I was really excited when I finally got my Hydroponic Nutrient Solution.  So, the following day after we got the nutrient solution (October 28), I searched our house for a container that I can use for the project.
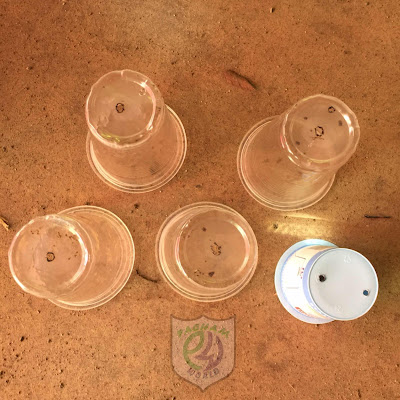
And I found this!


These I think will be perfect for a Peppa Dew plant.

So, I converted it into a hydroponic container.

First, I cut a hole on the blue lid, big enough for the red cup to fit in.

Then I punched some holes in the red cup.  Those holes are intended to let some water in.  Also, that is where the roots would eventually come out to reach the water.


Lyle, (the one where we bought the solution from) told us that we should put 25ml of each solution for every 10 liters of water.

The containers water level should be just enough for it to reach about a centimeter of the cup.

The container will need 2 liters of water for that, which means that I will have to put 5 ml of SNAP A and 5 ml of SNAP B.


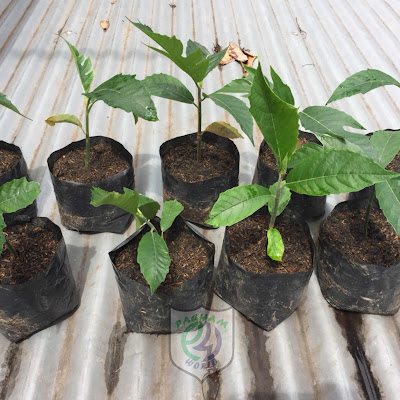
I then put some white stones on the red cup and then the Peppa Dew plant (the one I planted last September 29 - October 14 blog posting date).  Then covered the roots with some more white stones (first picture).

I hope that the plant would bear many fruits.

Wish me luck!


Sunday, February 3, 2019

The SNAP Hydroponic Solution


SNAP solution or Simple Nutrient Addition Program solution is one of the many nutrient solutions that you can use for hydroponics.

SNAP was developed by Dr. Primitivo Santos and Dr. Eureka Ocampo of the University of the Philippines Los Baños, Laguna, Institute of Plant Breeding, with the help of the Department of Agriculture’s Bureau of Agricultural Research.  They made their research in 1999, twenty years ago.

This was developed as a low-cost solution for small scale (backyard and commercial) farming.

Low-cost, because you only need a container with a cover to hold the water with the SNAP solution, and some cup/s with some gravel or coco peat that will hold the plants.  Also, the solution itself only cost around Php300.00 to Php350.00 a pair.  And you do not really need a water pump, unlike other large-scale hydroponic farms.

A set of SNAP is composed of SNAP A and SNAP B, which you will add to water one at a time.

The ratio is 25ml of SNAP A to 10 liters of water, then you need to mix it well.  After that, pour 25ml of SNAP B to your 10 liters of water with SNAP A solution.  Then mix it well again.

You can use either the SNAP A first or the SNAP B first.  Just make sure not to pour them both at the same time.  I have not tried it yet, but they say it will have a chemical reaction and your solution will turn to white stones.

That is also why they came in separate bottles.

Most of the SNAP Farmers/Gardeners use a styrofoam box.  The used styrofoam box that is used to transport grapes is the most economical.  One can even get it for free, just ask your friendly fruit stand seller for some.

University of the Philippines Los Baños is giving seminars about SNAP.  I hope I can attend one of those seminars this year.

I will make an update of this post, once I learned some more new things about SNAP.


Sunday, January 27, 2019

Self-watering Pot : Update 01 (Epic fail!)

(June 17, 2018)

This project started last June 02, today is June 17.

The soil in the pots are as you can see in the picture above are still wet.  So I think that it is safe to say that this self-watering pot is effective.  Just do not use it in the rainy months, because the plants that you would put in it would most probably drown.  As what happened to the spring onions that I have planted in mine.

I think that starting this month of June 2018, it had been raining daily.  And this really was a bad time to test this kind of project.

The sky is very cloudy, and there were days when the sun does not even shine.

That is why my plants died.

I will have to try this again come summer time.

And maybe next time, I will also have to reduce the water and let it dry up a little.


Sunday, January 20, 2019

The Hydroponics Pacham Project

(Photo: January 02, 2019)

Hydroponics is a soilless method of growing plants, it instead of soil uses a mineral nutrient solution that is added to water.

Hydro = Water
Ponos = Labor

Or working water is another of its meaning.

I have seen a lot of people using this method of growing their plants, and I have for a long time wanted to try this method.

I have the Water.
I have the seeds!
I even have the containers!

My problem was the mineral nutrient solution.

I joined my first Hydroponics FB group last March 2017 (That was when I was still trying out Aquaponics - which I am still interested to do, but I will have to do this one later).  The FB Group is Aquaponics & Hydroponics  Growers in the Philippines.  I am not sure if this is where I learned about the SNAP Solution, but when all of my Tilapia died, I started focusing on Hydroponics.

I found a hydroponic mineral solution in Facebook that people in the Philippines are using.  And last August 26, 2017, I joined their FB page.

The FaceBook page is SNAP Hydroponics Grower.  And here is (again) where I learned about Hydro Greens, where I was able to get my first SNAP Solution last October 27, 2018! Yey!!!!!

I contacted Hydro Greens and asked if they have any available solution.  And I had a quick and positive reply from Ma'am Nilda.  So, together with my friend Boss Louie Ancaya, we drove to GMA Cavite to pick-up our SNAP Solution.

Ma'am Nilda was not there, but she already told her youngest son (Lyle) to meet us.  Lyle was very kind enough to show and teach us some of the hydroponic ways of planting,  and many thanks to you for that Lyle.

(The Lettuce Seedlings, Lyle, Boss Louie and Me)


Miss Nilda is also sending many helpful tips on Hydroponic planting via messenger.

If you need the SNAP Solution, I highly recommend for you to contact Hydro Greens.

I have the water, the seeds, the containers and I now have the Nutrient Solution!

Now, The Hydroponics Pacham Project begins!


Sunday, October 21, 2018

An Unknwon Chili Update #1


October 11, 2018

About our mystery chili.  The one that we do not know the name.

The picture above was taken today, exactly 12 days after it was planted.  I am really so happy that most of them have already sprouted.

The first time I saw a sign of life was last October 06, or 7 days after planting.

(October 06, 2018)

This is how it looks, the following day.  I did not see any other sprouting seeds, just this one.

(October 07, 2018)

On the 9th of October (two days after),  these are what I saw.  Many have sprouted.  But for the others, I will still have to wait.

(October 09, 2018)

And today, only a few of the holes in my seeding trays have no sprout in them.

We are still going to wait for them, and I hope they would show themselves soon.


Thursday, October 18, 2018

Agrilink 2018! Part 1.


October 04, 2018

The annual Agrilink was again held at The World Trade Center, Pasay City, Philippines.  This was last October 04 to October 07 (Thursday to Saturday, 9:00 am to 6:00 pm).

This year PachamWorld was able to have its appearance in the event.  No, not as an exhibitor (yet), just a visitor.  But hopefully, someday we would have our own booth.

I arrived at the venue before 10:00 am, and the place was jam-packed.  The people in line at the registration booths was so long that I decided to go out and check the stalls outside first.

The live animals were placed there, together with the different machines used for farming.  The gardening supplies were also there. Yey!

(Peacock)

(Peking Duck)

(Geese)

For the animals, I saw some pigs, chickens, ducks, geese, ponies (i want one!), peacock and a camel.  Yes, a camel (I also want one, although I do not know what I would do with a camel, ride it to work probably?).

(Various grafted fruit-bearing trees)

(Various grafted fruit-bearing trees)

 (Insulin Plant)

(Siling Pangsigang)

(Bell Pepper)

For the garden needs, I saw different kinds of Mulberry trees, fruiting already, grafted kalamansi seedlings, and as I expected, lots and lots of chilies (seedling and fruit-bearing).

(Chili Seedlings)

The chili seedlings that they were selling are still on trays (seedling trays), I did not bother to ask how much they cost any more (I cannot buy any anyway),  because it would be very hard for me to carry those home,  I did not bring a car.  I wanted to buy some because I see that the seedling are very nice and healthy.  Maybe next time.

I have already expected that many exhibitors will have chili on their booths (plants, seedlings, and fruit) because there was a lot of buzz on chili price these past weeks.  It reached a record high of more than a thousand peso per kilo.  No market seller is giving free chili anymore.

After the outside tour, I went to register, there still was a long line, but after 15 to 20 minutes, I finally got my ID.

What are inside the hall next time.

Sunday, October 14, 2018

An Unknown Chili (The Beginning)


September 29, 2018

This chili was given to me by Kuya Jhen last September 23, 2018.  Below is the plant where he got it from, well this is actually his plant.


He told me that someone gave him some seeds, and said that those were Ghost Chilis.  He had a Ghost Chili plant before but was not able to propagate it, until the plant died, more than a year or two after he planted it.  It was a pity really.  Ghost Chili plants are really nice to the eyes.

Well, back to this Chili.  So, he planted the seeds, and this is what it turned out.

We do not know the name of this chili maybe you can help us.  If you know its name, kindly put it in the comment section below. Thank you.

I have been looking online, and I saw two that resembles this.  The first is the Liebesapfel sweet chili pepper.  The other one is the Picuante or Peppadew chili pepper.

Our chili has a diameter of about one to one and one-half inches only, and it is less than an inch high, like a small tomato.

The plant really looks good, especially when the fruits are already ripe.  The fruit also turns red, like in the first picture.

I planted the seeds that Kuya Jhen gave me today, 69 seeds in all.


Hopefully, they would all grow.

Until next time.


Friday, October 12, 2018

Mushroom Update #4 (First Harvest)


October 07, 2018.

Yesterday morning, Eldeen harvested the three mushroom bags (the ones in update #3).  And today, I got some from two other bags.

When I got home, I weigh the two-day harvest, and it was almost 200 grams.


Lanie will be making some mini mushroom burger patties with these.  Soon I will post her recipe.

To date (37 days from the beginning and 7 days after the humidifier), only around 10 bags has fruited.  Hope to have more of the bags fruit in the coming days.

I am really excited to taste the burgers :-)


Wednesday, October 10, 2018

Mushroom Update #3 (They're Alive!!!)


October 04, 2018

My brother Eldeen sent me the picture above.

It had only been four days since we've installed the humidifier, and when Eldeen visited 'The Box' this morning, he saw this three fruiting bags that have fruited.

This is the picture of the third bag.


Harvest time would probably be tomorrow afternoon or Saturday morning.  We'll see.

We hope that this is the start, and in the coming days, all of the bags would bear their fruits.

Until the next update.


Sunday, October 7, 2018

Mushroom Update #2 (The Humidified Mushrooms)


September 30, 2018

Day 30 of our mushroom project.

Things really aren't going well with our mushrooms.  To date, we only had 4 fruitings, and one of those bags is the one that already had fruits in them when we got it, it just had another flush.

We still are not able to give this project its needed attention.  My brother and I both lives far from its location.  I think Eldeen visits them every other day, while I can only visit on weekends (either Saturday or Sunday).

And to make it up to them (again), we added this humidifier.  My brother ordered this from an online store about two weeks ago, and it was finally delivered!  Talk about fast delivery (hmph!).  He ordered three items from this online store, some vertical pots, a timer, and this humidifier.  He made the order last September 17.  The pots were delivered on the twentieth, the timer on the 24th, and this humidifier just this 28.

Eldeen installed our DIY humidifier yesterday (September 29). 

He used a 5 liter PET bottle, where he cut two holes.  One is for the PC fan (the intake) to blow the mist, and the other one is where the mist would come out.


This is how it looked.  The PC fan was attached using four screws.

Below is the Timer.


It is set to work in a two-hour cycle. 

30 minutes on and 90 minutes off.

We hope that with this addition, our mushrooms would be happier and all of the bags would fruit.  Soon!

Until next time.

Friday, October 5, 2018

Mushroom Update #1 (The Boxed Mushrooms)


September 14, 2018

We had these mushrooms for 14 days now, and we haven't really taken good care of them. That is probably why we only had up to date, one bag that had fruited.

But today, we wanted to make it up to them.  We are going to build them a house!  Well, it is actually a box, or at least that is what my brother and I intended it to be.

We bought some 2 x 2 x 12 Coco lumbers and 1/4 kilo each of 4" and 3" nails.

I cut the Coco lumbers into 4 pcs of 60" long, 4 pcs of 22" long and 4 pcs of 20" long.  This will serve as our frame.  My brother was the one who assembled them together.

The picture above is what we had made.

We forgot to buy some tarpaulin that we will use as cover for the box.  But we will have those next time.


In the meantime, we have used some old carton boxes as covers.

We are also planning to put a humidifier with a timer in it.  Hope to have those in my next post.

Thank you.


.

Sunday, September 23, 2018

Sweet Basil For Sale!


September 23, 2018

Our first Sweet Basil customer.

Presenting Sir Chino!  Thank you very much!

He said that basil is one of the ingredients in his cucumber juice.  I remember that we also have a juice recipe that includes basil.  The Basil Lemonade.  I forgot to ask him if his recipe has lemon in it, maybe it's the same, or maybe he can put his recipe in the comment section if he has a different one.

I explained to him how I propagate these plants, and in case you also would want to know, here is the link.


I posted the picture above on our Facebook page last night (around 10:00 pm, September 22, 2018). 

And this morning, I got a few messages.

The first message was from Sir Chino, and since their place is near ours, I delivered his order today.


I will be delivering some more tomorrow.

Thank you very much for the orders!


Wednesday, September 19, 2018

Siling Pangsigang - Update #4


September 03, 2018

Made my first delivery!

Two pieces of Siling Pangsigang plants (fruit-bearing already) sold!

First costumer/buyer Miss Selena! (Thank you!)

I can only bring two pieces per day and Miss Selena bought four, so, I delivered the first batch on September 03 (Monday) and the rest the following day.

Miss Lerma and Miss Memie also bought a plant each, which I delivered last September 05.

All of them are my office mates.

My wife also posted this on Facebook, and there were many who inquired and wanted to visit us, but unfortunately for us, we only had six pieces available at that time.  The other plants haven't fruited yet.  I hope that they would soon.

I still have some pending orders at the moment, and these are just from my office mates.  I also have some friends who told me to contact them once I have some already available for sale.

(This picture was taken September 18, 2018)

I have three pieces available now and I would be delivering soon.

Just a side Note:

Prices of Sili in the Philippines today are rising.  They said that Siling Labuyo or the Red Chili is now more than Php1,000.00 per kilo, this used to be only around Php50.00.  I really am not aware, and I never really bothered with what had caused this.  Maybe the inflation, maybe the people in the government, or the charter change or maybe even climate change :-)  But that is really ridiculously high.


Wednesday, September 12, 2018

Mushroom (The Beginning)


September 01, 2018

Finally!

We will be starting our mushroom farm!

Way back in 2012 my brother and I attended a seminar about mushroom farming.

In that seminar, all who attended were each given a certificate and a fruiting bag (like the picture above).  

My brother (Eldeen), was able to make this fruiting bag.  He took a little piece of the mushroom that our fruiting bag produced and cultured it in agar.  

Agar is the gelatine-like substance that scientist use to culture bacteria.  Maybe you would remember using that in your high school science class.

When the agar was fully colonized, he divided it and put a piece in each bottle that contains sorghum.

Sorghum is a kind of grain, and this is the grain we use here in the Philippines for mushroom production.

Then when the bottles were fully colonized, again, he divided the content to the fruiting bags that he made.

I cannot remember how many he was able to harvest from those fruiting bags.  But he said that some of the bags had some worms, and he needed to dispose of those at once.  That meant that he was not able to sterilize the bags correctly.  I think he steemed those bags for five hours, but it should be at least eight hours (according to a new source). 

Today, I went to Silang Cavite, on the mushroom farm of Miss Divine Camama and got us 100 pieces of fruiting bags.


Hopefully, we will be able to harvest many from these bags and also make more fruiting bags.


Tuesday, August 28, 2018

We Call It Kamansi!


July 02, 2018


My good friend Mr. Kuya Jhen Cantada gave me these seeds last July 01, 2018.

The following day, I planted them!

I used these plastic disposable cups as my seedling pots.  I just punched a hole at the bottom as their drainage.


I filled half of it with soil, then I put a seed in each pot.


Then I covered it with more soil.


And there it is, I have planted the nine seeds!


The picture above was taken last July 15.  Two weeks after planting.


And this picture was taken August 05.  35 days after planting.

Last August 19, I transferred them to a proper seedling bag.


As you can see in the pictures above, the cups were I planted them are already too small.


I removed them from the cups and planted them in the black seedling bags.


The first picture from this post was also taken last August 19.

I posted that picture on our Facebook page last August 24, with a caption "Now Selling!".  But up to now, no one was inquiring, eheheh.

I have some office mates who told me they wanted to buy,  but they all thought that I was selling Calamansi.

Hopefully, some would inquire and buy our first product.

Until next time.