Arrange per Blog Topics

Showing posts with label Aquatic Farm. Show all posts

Friday, May 11, 2018

Saving my Azolla


(May 09, 2018)


The picture above was taken May 09, 2018, two days ago.  Now is May 11, and this is (unfortunately) how it looks today. 


 Note that in this picture, I have already added water in the container, when I saw it yesterday, the water level was less than half.

So, what happened?  My father’s cows are what happened. 

It is a very hot summer in the Philippines right now, and in the evening of May 09, the cows saw my Azolla bucket and decided to eat them and drink the water.

These are the last of my Azolla.  I gave the large Azolla tank back to my father so he can use it for his cows.  They really need a lot of water this summer.

As you know, I also have two backup Azollas in small containers, but this is how they look as of May 09.


Dismal, right?

Google weather says its 33°c now, but in the previous days, the temperature was really higher.

Back to the bucket.  So, I cleaned the bucket and change the water and the cow dung solution.  I added another bucket where I can put them, hopefully, this could save them.

First step


I transferred all the Azolla to the large black basin.


Then I set the two pails.


Then, I transferred the remaining healthy Azolla’s back to the growing containers.  Unfortunately, these are all of them.  The others are mostly dried and dead.

I also transferred one of the dismal back-up Azolla to a larger container and put it in a cage so that the cows would not be able to get them (hopefully).


The two containers, I placed inside our gate so that (again), the cows would not be able to eat them, and I am really hoping that these remaining Azollas would grow.


Monday, May 7, 2018

I Got Duckweed!


(Picture January 26, 2018)

Last January 20, 2018, my college friends and I went on a road trip.

Destination: Bulacan, to the house and chicken farms of one of our friend, Mr. Edsel Escudero.

But this is not about the road trip, nor the farm.  This is about what I found from one of his farms, DUCKWEEDS!

I remember when I was a kid that duckweeds grew abundant in a stream near our house, the stream is still there, but the duckweeds were no more.  And I have been looking for this for quite some time now (well, since I learned about Azolla actually).  Because, before, when I search online about Azolla, some pictures that I saw were that of the duckweeds.

Both the Azolla and the duckweed grows on water, on the surface of the water, maybe that is why some people show duckweed pictures instead of Azolla.


My friend Edzel has a pond in one of his farms.  He said that the previous owner of the property was going to make it a vacation house, and he had that pond dug because he wanted to construct a swimming pool, but unfortunately for him, he got into some financial problems and he had to let go of that property. 

Back to the pond.  I remember Edsel asked me before if he can grow Azolla in that pond, that was when he saw my Azolla Project blog. But he did not show me a picture of the pond then, so I did not know that he had duckweeds in it.

While he was giving us a tour inside one of the buildings of his layer chickens (it was an elevated building), I saw the pond, and the water was covered in green, and my eyes twinkled because I knew at once what that green thing was. DUCKWEEDS!

(I was looking for the picture from that vantage point inside the building, but unfortunately, I do not have it.  Probably got too excited to go down and forgot to take the picture)

I asked him to go down the pond to take a closer look, he said that they call it ‘Lumot’, and I told him that those are duckweeds, and it is just like Azolla.


I took some of it home.

And that is how I got my duckweeds.

As of writing date (May 02, 2018), I have yet to study it, but I am using the same style I use to grow my Azolla, I just noticed that they grow a lot faster than Azolla.  More on that in my next post.


Sunday, March 12, 2017

Azolla Project Update 2


It has been Forty Two Days since I cleaned and added soil in my Azolla tank (January 21).  I have added a couple of buckets of water, I forgot how many buckets exactly, maybe three or four, when I noticed that the water level was getting low, last February 19, a day after my second harvest.  As for the cow dung, I only added some yesterday.  I was able to harvest three times already, including yesterday (March 11).

The pictures from January 21 to 29 are in my first Azolla update.  The following are the daily pictures from January 30 up to March 12.


Pictures 1 to 6 above are from January 30 to February 4.

My first harvest was last February 5 (15 days after planting), I took two thirds (2/3) of it, which I fed half to my Tilapia and half to the ducks.  I could have harvested since day 12 (February 02-Picture 4), but I wanted it to be thicker and greener, besides, I have a job on weekdays 😁


Picture 1 is from February 5, before the harvest, picture 2 is after the harvest.
Pictures 3 to 6 are from February 6 to 9.


Pictures 7 to 12 are from February 10 to 15.


I do not have a February 16 picture.  Picture 13 was last February 17, and pictures 14 and 15 are both from February 18, before and after my second harvest.
Picture 16 is from February 19, after I added some water.  Pictures 17 and 18 are for February 20 and 21.

Second harvest was last February 18 (13 days after first harvest), were I think I took more than Two Thirds (2/3) of the Azolla that time.  I gave some to the Tilapia, ducks and chickens, but most of the batch, I gave to my Uncle, as a starter kit, so they can also start planting, to be use as feeds to their ducks and chickens, and look, Triple A (the dog) also wants some......


I will check on their progress later, 


This is the pond that they have use to grow their Azolla, the water has a greenish color already, hope it will work.

Back to my tank.


No picture for February 22, picture 19 is for February 23, no picture again for February 24, next pictures are for February 25 to March 1.


I have used the dates of March for the pictures above, I do not have pictures for March 2 and 5.

The production from the second harvest, and a few days after it was still good (February 19 to March 06), but I think the yield was getting fewer after that  (or was this also because of over population, it was 16 days after second harvest after all).  If you would take a look at March 7 picture, they are the same, or even fewer than that of March 06.  They have probably depleted the nutrients from the cow dung, so I must add some more.  Also, it is now summer time in the Philippines, and temperature really gets so high from 11 am up to 3 pm, some days even up to 5 pm.

This was what I was thinking the night of March 10, because as of March 9, you can already notice the decrease in population, but when morning of March 11 came, I went to see how my Azolla are doing, and the picture below shows a horrific scene.  Instead of dark green, I am seeing many brown leaves.  My Azolla are dying.

(March 10 and March 11 pictures)

I took action at once.  I removed all the Azolla from the tank, and put them all in a bucket.


I measured the depth of the water, it was only five inches, I added some cow dung, and mixed.  


Then I added water, four buckets full (the green one), the water is now 11 inches deep.

After that, I added some Azolla from the white bucket.  The rest I again gave to the Tilapia, ducks and chickens.


As of today (March 12), this is how it looks.

Maybe I should add some cow dung after every harvest, and also I have to maintain the 11 inches level of water, specially this summer season.  My tank is made of metal, and it can make the water temperature higher also.  Should I put some cover to it, besides the net that I have?

I still have the Back Up Azolla, so, I need not worry if anything unfortunate happens to my main tank.

That is all for today, I hope the Azolla in my main tank would recover.


Monday, January 30, 2017

Update on my Azolla Main Tank

This are the pictures of my Azolla main tank from January 21 up to January 29.


Pictures one (1) to six (6) above are from January 21 to January 26.


Pictures one (1) to three (3) are from January 27 to January 29.

A few more days and this tank will be ready for harvest.


Last Sunday, January 22, I bought this green screen to cover my tank so that the leaves from the Ipil-Ipil trees would not fall in to my Azolla, but I need something with smaller holes, a mosquito net maybe.  The holes of this one is still big enough to let some of the leaves fall inside the tank.  Hopefully next post, I will have my net ready.

Again, if you can share something about Azolla, please do write in the comment area below.  Thank you.


Sunday, January 29, 2017

Update on the Azolla Back-up

This is an update on my two Azolla container back-ups.

Container 1.


Picture one (1) was taken last Saturday, January 21, picture two (2) on January 22, three (3) and Four (4) on January 23 and 24 respectively.

The growth rate is extremely fast, in just three days, the entire container is almost covered by our Azolla already.


Pictures five (5) & six (6) were taken January 25 and 26 (Thursday).  As you can see, in just five (5) days, from January 21 to 26, we can already make a harvest.  And that is what I did that Thursday as seen on pictures seven (7) and eight (8).

Container 2.


The eight (8) pictures above were also taken from January 21 to January 26, and I also harvested more than half of the Azolla in this container.

The yield of the second container was greater than the first one.  Maybe because we started also with a higher number of Azolla in this one.

So five days is a good enough time for harvest in our little experiment.

I will show you next my main tank.


Sunday, January 22, 2017

The Azolla Back-up


Having a back-up container for your Azolla is a great idea, and you really should have at least one.

This is my third post regarding the Azolla plant, and I really need to mention this.  For others like me who do not have different ponds to grow them, we really need to have a back-up container.

In my post last January 20, I have included soil in the usual water solution that I have been using.  And since I am not yet sure of the result of this, I created another back-up container for the Azzola (I already have one).  This is to ensure that I will still have some Azolla to propagate if something happened to the main tank.

In this back-up container, I have used the usual water solution that I have been using.


A bit of cow dung, and water.


Then I have put some Azolla.

So remember, especially if you are experimenting on the plant, have as many container as possible, even as small as this.
(all picture: January 21, 2017 - 1:43pm to 4:46pm)


Saturday, January 21, 2017

How I Plant my Azolla


In my previous post regarding Azolla, I briefly mentioned how I was introduce to it and how I got my starter kit.

This post will tackle on how I am growing them.

But before that....  An additional info first....

Azolla are also called mosquito fern, according to my research  (ehehe, yes I did some reading) 
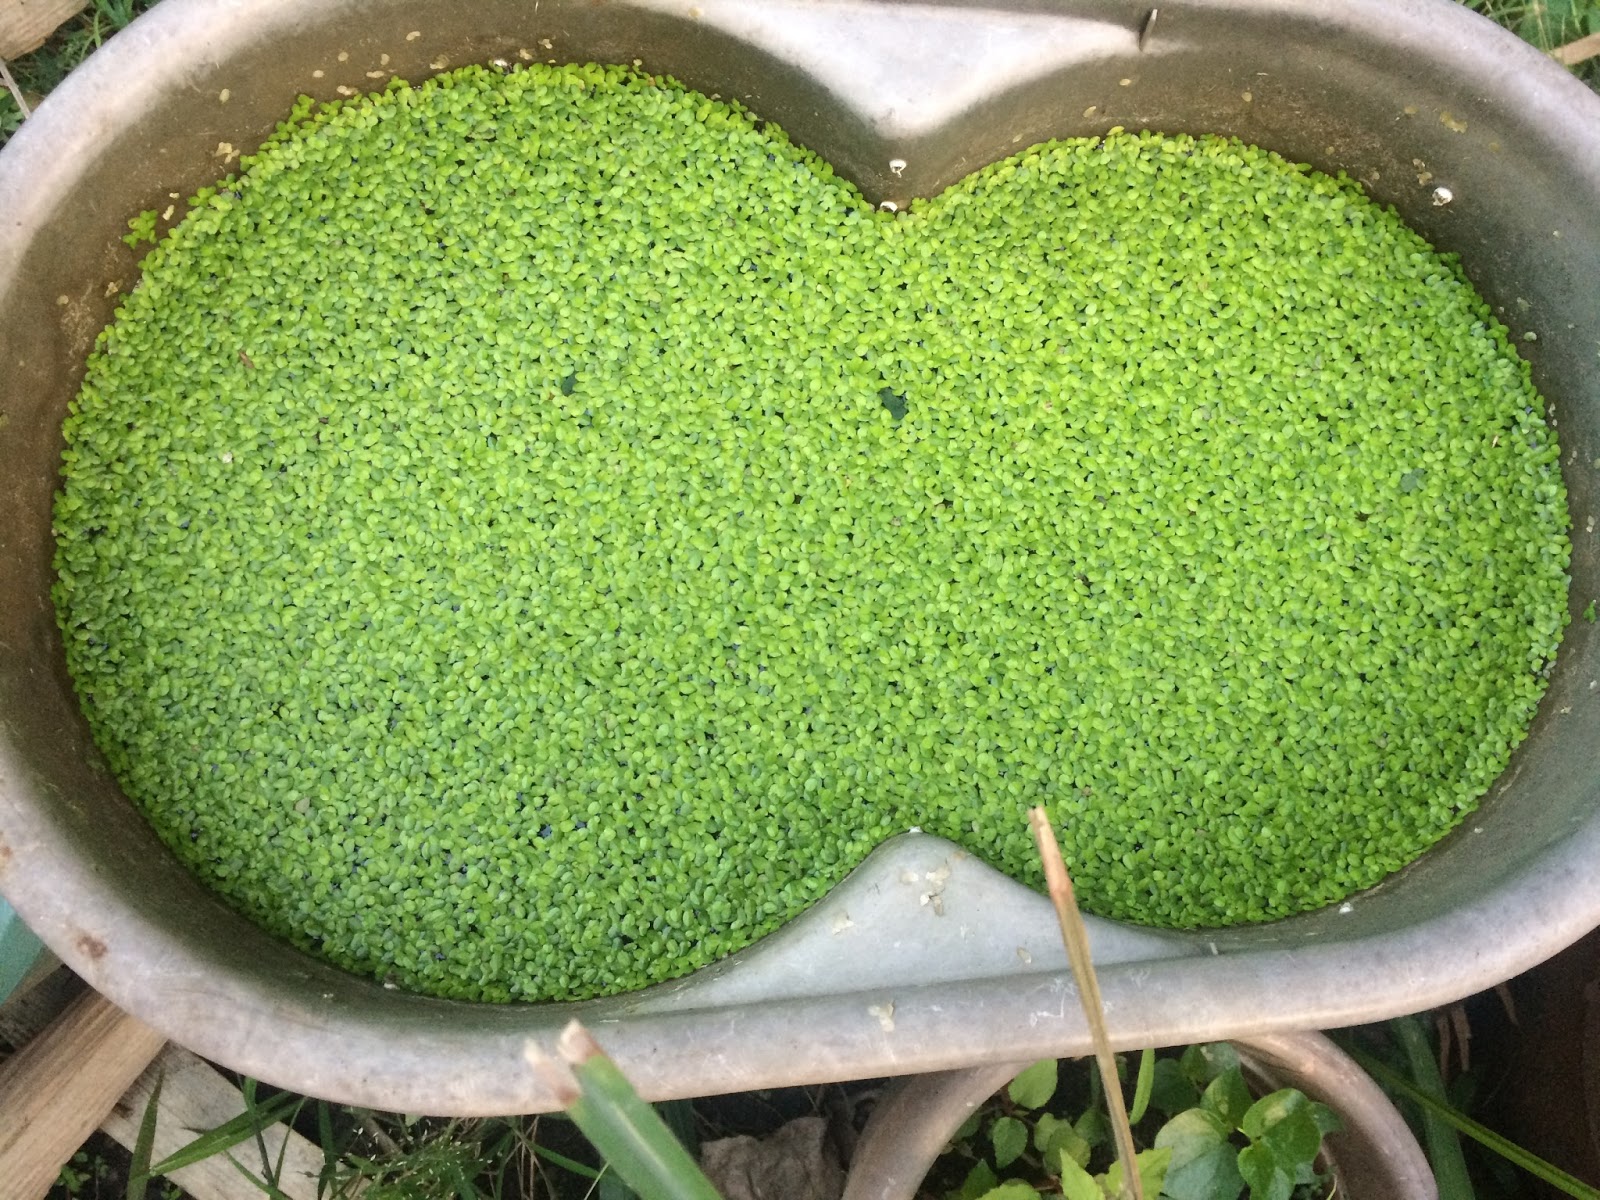
this is because Azolla can grow so thick that it would cover the entire surface area of the water, and because of that, mosquitoes would not be able to lay their eggs on the water.  Also, this plant grow so fast that any mosquito larvae already in the water would not be able to reach its surface to breathe, practically choking and killing them.

So, this plant is also good in controlling the propagation of mosquitoes, just put some in places where mosquitoes can lay their eggs ☺

Now to the planting part.

I’ve tried a couple of ways of growing the Azolla, we know that they floats on water, so I tried different types of water and tested which will be best to grow them.

I tried clean water directly from the faucet, the result was, they grew a little, then, they suddenly just dried out and died, I think two weeks was the lifespan for that experiment.

I also tried the water from my fish tank, this did a lot better, combined with a great deal of sunlight, they have grown pretty well.

But the best water that I have tried is the one that I have put some cow dung.  The color of the leaves became very green and the population became three times as many in just less than two weeks.

This is the growing media that I have been using ever since.

Another thing that I noticed is that the water also needs to be replaced once every month.  I did try to use the same water for a longer period but the production became slower.  So I think it best to replace it every month for a better yield.

This is my step by step process in growing the Azolla.  I have modified it again this time, because I saw a post from the FB page of Azolla Pilipinas that they have been adding soil in their tank, so let me also try that.

First is the tank. 


Picture taken Jan. 21, 2017 at 8:37 am

I am using an old refrigerator body as my tank.  My father welded and patches the holes so he can put water in it.  I think he was using this before as a container where his cows would drink from.


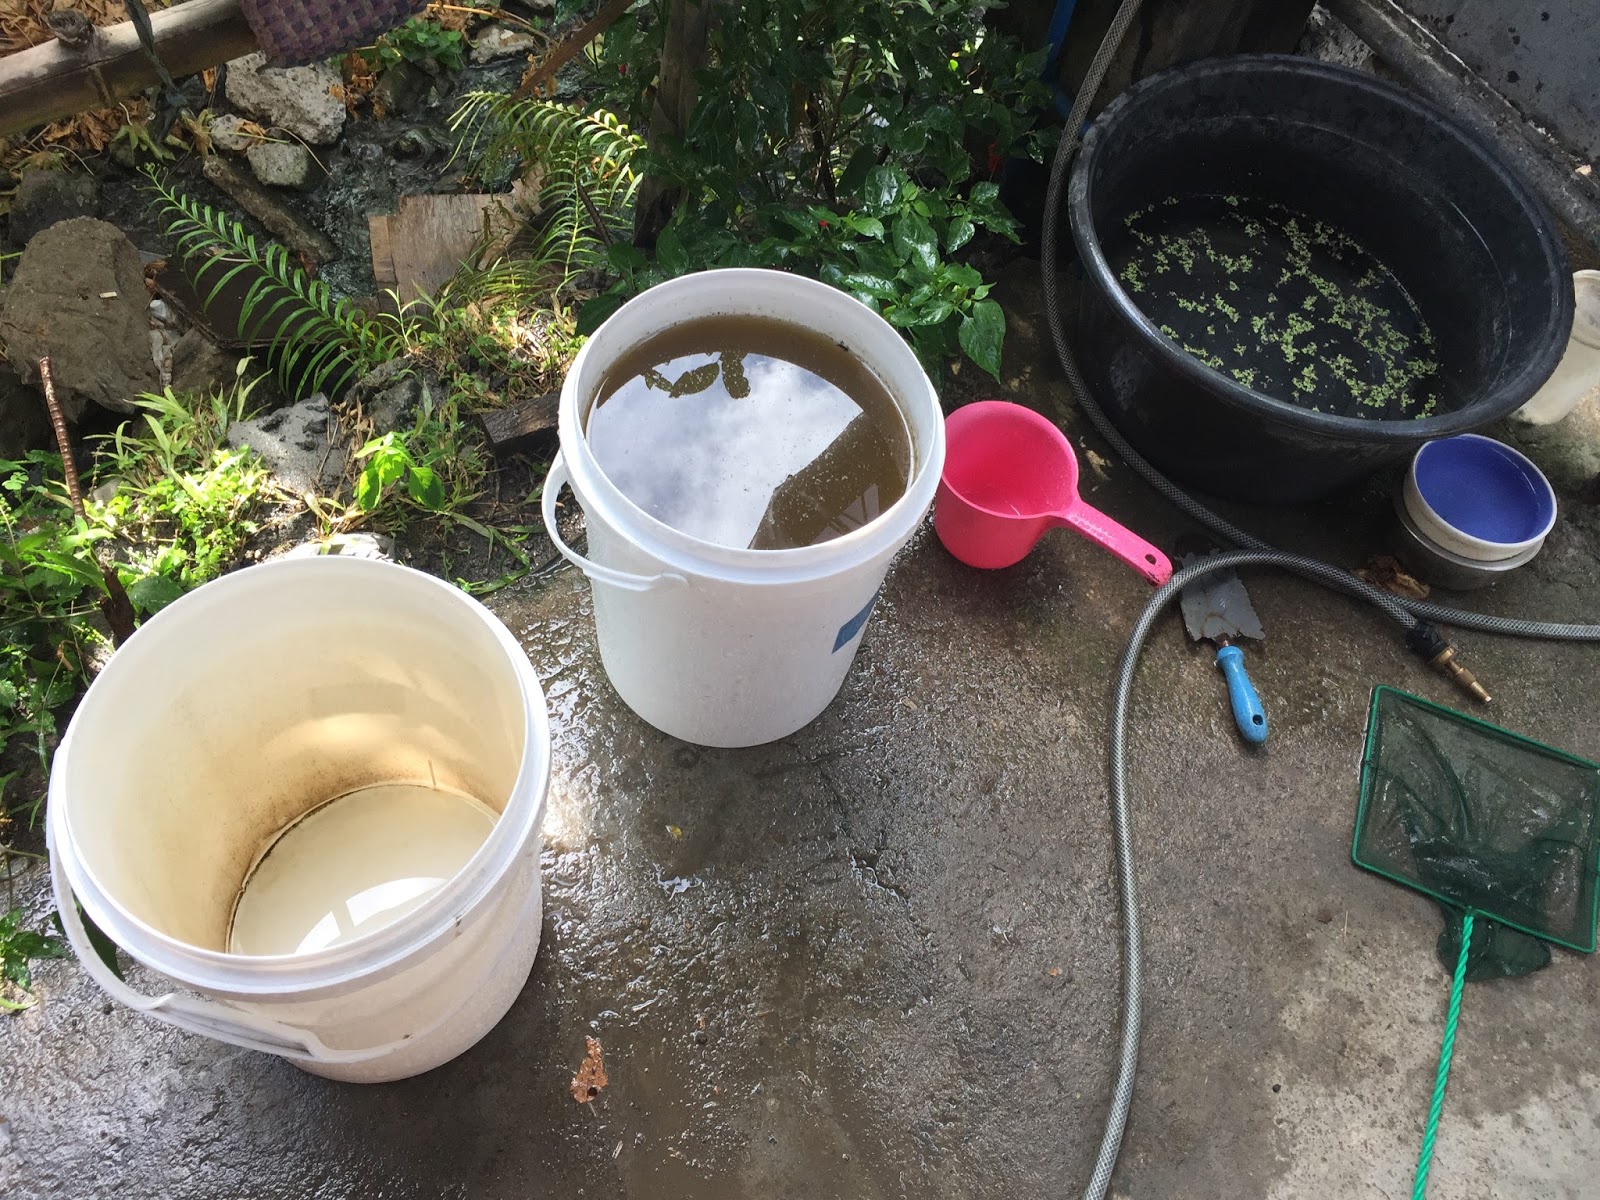
Wee need to remove all the Azolla first.


Then transfer them to a bucket.


We then need to clean the tank, remove the old water and any sediment that was left.  Just rinse the tank with some water.


There we go, now the tank is all clean, we are now ready to put the water mixture in.


This is the additional part that I have added to my process, I have included putting in soil to the tank.


Twelve shovels full!


We need to put our water now.  I have used two and a half bucket of water.  Unfortunately for me, at the time when I was cleaning the tank, I had to stop because we had a water interruption.  But since I could not wait for too long, I used the water from my fish tank.

I have used two full buckets of water from the fish tank and half a bucket of clean water.


Now, the cow dung.


This much is good enough.


Just stir a little to mix the solution ☺☺☺☺


There were some floating leaves and stems, so I took them out.


And there you have it, the soil dung solution.

The last step is to add the Azolla, maybe as many as could cover one third part of the water's surface.  We need to distribute the plant, do not let them bunch up in just one part of the tank.


(All pictures have been taken January 21, 2017, from 8:37 am to 11:38 am)

We will then just have to wait for about two weeks, and we can harvest half to two thirds of it.  Then we can wait for another two weeks and harvest half to two thirds of it again, and then, we need to replace the water and repeat the cleaning process.

I will take some pictures and show you the progress is a few days.


There you have it, this is the way I plant my Azolla.

If you have other information regarding this plant, please feel free to impart you knowledge, give comments or suggestion in the comment section below, thank you.